
Checkout with Payment Terminal
Complete a sale by processing payment and converting the cart to an order.
When the cart is ready, tap Pay to register payment, then Order to confirm and create the order. The payment flow varies by method: card payments are processed live through the connected payment terminal (Baxi bridge), cash payments walk through a tender-and-change flow, and other methods record an amount directly.
This page covers the full checkout sequence: cart validation, payment by method, and order creation.
The checkout area
The bottom of the cart panel contains:
| Element | Shown when |
|---|---|
| Validation errors / warnings | Cart has issues flagged by the server |
| Payment status banner | Cart is partially paid or overpaid |
| Pay button | Always shown |
| Order button | Always shown |
Cart validation
After each change to the cart the server validates it. Results appear just above the totals:
| Display | Colour | Effect |
|---|---|---|
| Blocking error | Red box with error icon | Pay button is disabled until the error is resolved |
| Non-blocking warning | Orange box with warning icon | Shown for information — does not block payment |
The Pay button is also disabled while a pre-sale printer or drawer check is running (a brief check before opening the payment dialog).
Payment status banners
| Banner | Colour | Meaning |
|---|---|---|
| Partially Paid: [paid] paid, [remaining] remaining | Orange | At least one payment has been registered but the full amount is outstanding |
| Overpaid: [amount] [currency] | Blue | The registered payment total exceeds the cart total |
Pay button colours
| Colour | Meaning |
|---|---|
| Accent (e.g. blue) | No payment registered yet |
| Orange | Partially paid — some payment has been recorded |
| Grey / Paid label | Fully paid — no remaining amount |
Registering a payment
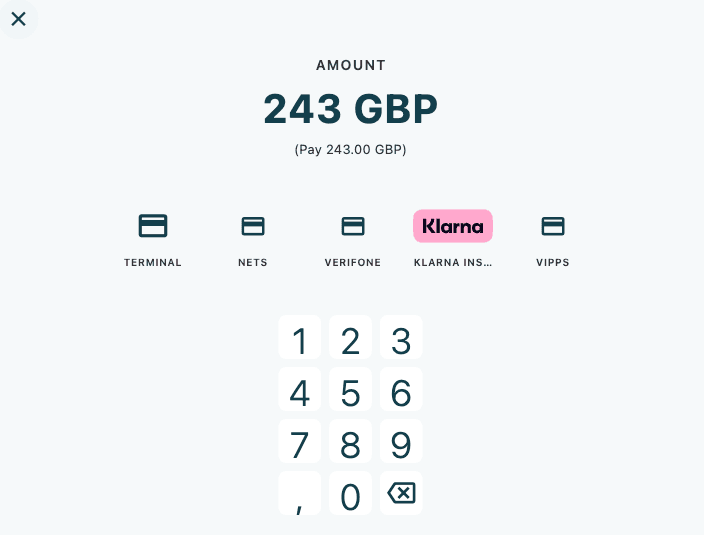
- Tap Pay at the bottom of the cart panel.
- The payment dialog opens showing the available payment method tiles for your store and market.
- Tap a payment method to proceed.
The flow after this point depends on the payment method chosen.
Card payment — terminal
When you select a card-based payment method, the app communicates directly with the connected payment terminal via the Nets Baxi bridge service.
- The payment dialog closes and the Terminal Payment screen opens.
- The screen shows the sale amount prominently and a Waiting for terminal… message with a spinner.
- The customer completes the transaction on the physical terminal.
On approval:
- A green check icon, approval code, card type, and masked card number are shown.
- The screen closes automatically after 2 seconds.
- The cart refreshes and the paid amount is recorded.
On decline or error:
- A red icon and message are shown.
- Tap Close to return to the cart. The cart is not charged.
The Baxi bridge service must be running on the local Windows PC or network device. If the terminal cannot be reached, an error is shown immediately. Check the terminal connection in Settings → Terminal Settings.
Cash payment — tender and change
When you select a cash payment method, the app guides you through a two-step tender-and-change flow.
Step 1 — Enter amount received
A numeric keypad appears. Quick-tender buttons for common bill denominations (100, 200, 500, 1000 for NOK; equivalent for SEK, DKK, EUR, USD) are shown as coloured chips matching real banknote colours. Tap a chip to fill in that amount, or type an amount manually.
Tap Confirm to advance.
Step 2 — Change
The settlement screen shows:
- The change amount owed to the customer (large, centre-screen), or a checkmark if exact change was tendered.
- A denomination breakdown of the suggested change (bills shown as rectangles, coins as circles).
- The tendered amount and cart total shown in smaller text below.
Open the cash drawer and hand the customer their change. Once the drawer closes, the screen advances automatically and the payment is recorded against the cart.
Gift card or credit note
If your store accepts gift cards or credit notes, a Gift card / Credit note tile appears in the payment dialog. Tapping it opens a dedicated code-entry screen where the cashier scans or types the code, views the available balance, and applies the amount. The screen handles partial redemption automatically — if the card balance does not cover the full amount, the cashier is prompted to register a second payment method for the remainder.
See Paying with a Gift Card or Credit Note for the full flow.
Other payment methods
For non-terminal, non-cash methods such as invoice:
| Field | Description |
|---|---|
| Amount | Pre-filled with the remaining amount due — edit for a partial payment |
| Comment (Optional) | A free-text note attached to the payment record |
Tap Add Payment. On success, the modal closes and the cart refreshes.
Viewing existing payments
If the cart already has payments recorded, the modal opens on the Payments tab showing all registered payments. Tap the Add Payment tab to register an additional payment.
Payment statuses:
| Status | Colour | Meaning |
|---|---|---|
| Paid / Approved / Processed | Green | Payment confirmed |
| Pending | Orange | Awaiting confirmation |
| Failed | Red | Payment was not successful |
When a single payment method has multiple transactions (for example, an authorisation followed by a capture), they are grouped into a collapsible card. Tap it to expand.
Creating the order
When payment has been registered (or for zero-value carts), tap Order (or Create Order if POS is not enabled) to convert the cart to a confirmed order.
A Creating order… notification appears while the request is processed.
Pre-checkout checks
Before creating the order, the app checks for the following issues:
Unbroken packages:
If any catalogue bundle in the cart has not been broken down into its component lines, a Packages Not Configured dialog appears. Tap Close and configure the packages before retrying. See Building a Package for instructions.
Missing shipment address:
If a shipment on the cart has no delivery address, a Missing Shipment Address dialog appears. Tap Edit Shipment to open the shipment editor, or Close to cancel.
Remaining payment:
If there is still an outstanding amount, an Unpaid Order warning dialog appears with the message This order has a remaining payment of [amount] [currency]. Do you want to create the order anyway?
| Button | What it does |
|---|---|
| Cancel | Returns to the cart without creating the order |
| Continue Anyway | Creates the order despite the outstanding balance |
Order created
On success, a green Order created successfully: [order number] notification is shown with a View Order action button. Tap View Order to navigate to the order detail page.
The cart panel clears and a new cart can be started.
If a receipt printer is configured and auto-print is enabled, the receipt is sent to the printer automatically after the order is created. If auto-print is not enabled but a printer is configured, you will be prompted to print.