
Initial Device Setup
Walk a new device through the first-time setup wizard — choose a market, store, and order type, set the language, configure a printer (Windows), and personalise the Home layout.
The first time a device signs in to the In-Store App, the Initial Setup wizard runs automatically before any other screens become available. It collects the few pieces of configuration the device needs before it can be used in store: the market it operates in, the store it belongs to, the default order type for new orders, the display language, and (on Windows) a receipt printer.
The wizard can also be re-run later from Settings — for example when a tablet is moved to a different store, or when a new printer is installed.
Prerequisites
- The user is signed in to the app — see Logging in.
- The signed-in account has access to at least one store. If it does not, the wizard shows a logout option instead of the form (see Variations below).
- A network connection — markets, stores, and tenant settings are loaded from the API at the start of the wizard.
Steps in the wizard
The wizard is a horizontal page-by-page flow with a step indicator (dots) at the bottom and a primary action button. The button is labelled Continue on every step except the last, where it changes to Get Started.
The number of steps depends on the platform:
| Platform | Steps |
|---|---|
| iPad / Android tablet | 3 (Store, Language, Home Layout) |
| Windows | 4 (Store, Language, Printer Setup, Home Layout) |
Use the back arrow at the bottom-left to return to a previous step. Once all required fields on the first step are filled, a close (×) button appears in the top-right that lets you finish setup without walking through the optional steps.
Step 1 — Market, Store, and Order Type
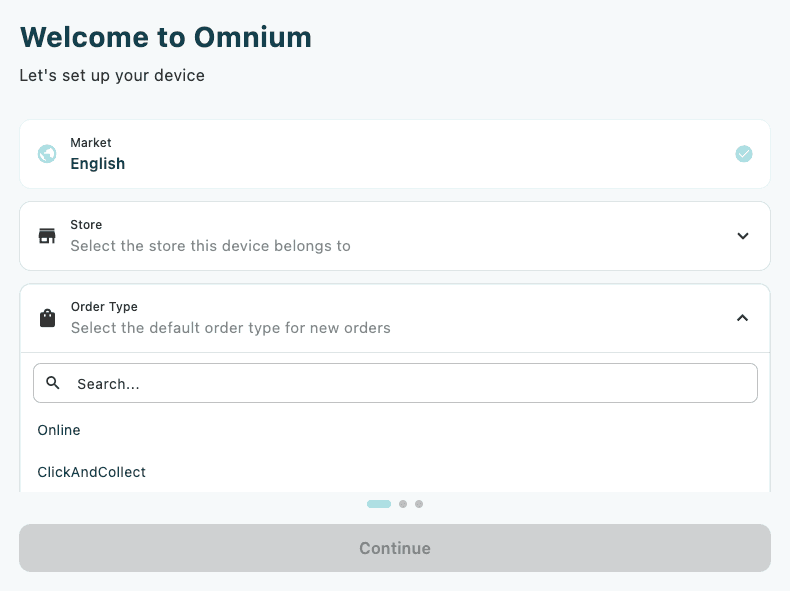
The first step is titled Welcome to Omnium with the subtitle Let's set up your device. Three expandable cards collect the values that will become the defaults for this device.
Market
The Market card only appears when more than one market is available to the signed-in account. On single-market tenants, jump straight to Store.
- Tap the Market card to expand it.
- Use the Search field to filter the list, or scroll to find your market.
- Tap the market to select it. The card collapses and shows a green check.
Changing the market afterwards clears the selected store if that store is not available in the new market.
Store
- Tap the Store card to expand it.
- The list is filtered to stores available in the selected market.
- Use the Search field to filter further, then tap a store to select it.
Order Type
The order type sets the workflow that new orders created on this device will follow.
- Tap the Order Type card to expand it.
- Tap an order type from the list to select it.
Virtual Keyboard (Windows only)
On Windows devices, a Virtual Keyboard toggle appears below the Order Type card.
- Toggle Virtual Keyboard on to Show on-screen keyboard for touch input.
- Leave it off if the device is used with a physical keyboard.
The Continue button is disabled until a store and an order type are selected (and a market, if the Market card is shown).
Step 2 — Language
The Language step is titled Language with the hint Choose your preferred language. It shows a single card with one row per supported language, each with a flag, the language name, and a check icon next to the currently selected one.
- Tap the language you want the app to use on this device.
- Tap Continue.
The supported languages are:
| Flag | Language |
|---|---|
| 🇬🇧 | English |
| 🇳🇴 | Norwegian (Bokmål) |
| 🇸🇪 | Swedish |
| 🇩🇰 | Danish |
| 🇩🇪 | German |
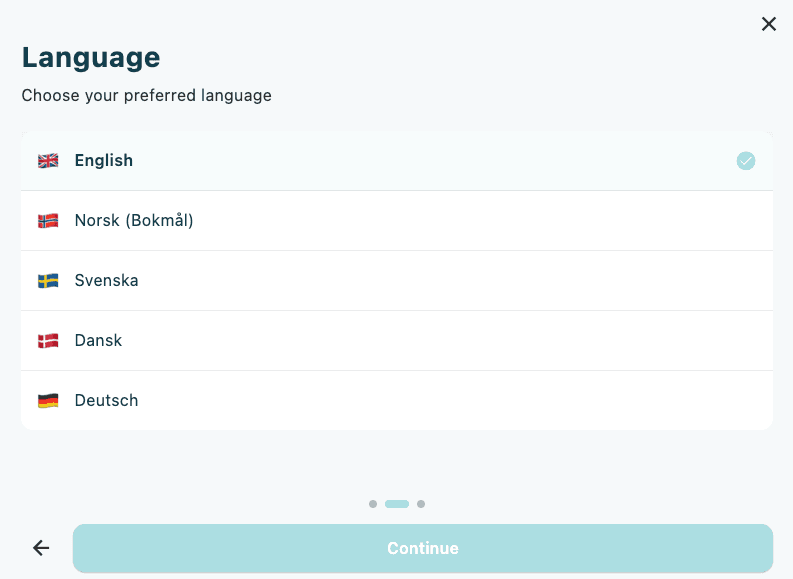
The language choice applies to this device only. Other devices in the same store can use a different language.
Step 3 — Printer Setup (Windows only)
This step is only present on Windows. It is titled Printer Setup with the hint Configure a receipt printer for this device.
The step embeds the standard printer settings panel so a receipt printer can be paired without leaving the wizard, plus a tile labelled Receipt Templates / Design custom receipt templates that opens the Receipt Template Builder in a guided tutorial mode.
- Use the Printer Settings panel to discover and pair a printer. See Receipt Printer Setup for full instructions.
- Optional: tap the Receipt Templates tile to design a custom receipt template now. See Building a Template.
- Tap Continue when you're done — neither pairing a printer nor designing a template is mandatory at this step.
Step 4 — Home Layout
The final step is titled Home Layout with the hint Customize what appears on your home screen. It embeds the same Home Blocks editor used in Settings → Home Layout, with two on-screen coach marks that explain how to use it:
- An add-button coach mark: Tap here to add product shortcuts, print templates, and more.
- A block coach mark: Tap any block to edit or reorder it.
- Add the blocks you want on the Home screen — quick-access tiles, last-purchased, recommendations, print shortcuts, and so on.
- Reorder or edit individual blocks by tapping them.
- Tap Get Started to finish setup.
See Home Blocks and Quick Access Tiles for what each block does.
What happens when you finish setup
Tapping Get Started (or the close (×) button after step 1) does several things in one go:
- Saves the chosen Market, Store, and Order Type as the device defaults.
- Clears the existing device registration so the device re-registers for the selected store the next time it talks to the server. See Device Registration.
- Marks initial setup as complete so the wizard does not show again on next launch.
- On a first-time setup, queues a small Settings showcase that highlights where to find these options later.
Because finishing the wizard clears the device registration, the device must successfully reach the server immediately afterwards to be re-registered. If the device is offline, complete setup somewhere with connectivity.
Variations
Changing the device's default market or store
The wizard can be opened again from Settings → Initial Setup to change the device's market, store, order type, language, or Home layout. When opened in re-run mode:
- The wizard pre-fills the existing defaults so you only need to change what differs.
- Finishing the wizard returns you to the previous screen instead of taking you to the Home page.
No stores available
If the signed-in account has no stores it can use, step 1 replaces the form with the message No stores are available for your account. Please contact your administrator or log in with a different account. A Logout button appears below it so the user can sign out and try a different account.