
Adding Products to a Count
Pick which products are part of an inventory count.
Before you can record counted quantities, you need to add the products that should be included in the count. Products are added from a dedicated search page. You can add a single SKU, all variants of a product, or all products matching a search query at once. Products can also be added on the fly by scanning a barcode from the count detail page.
The count detail page
Opening a count from the Inventory Counts list takes you to the count detail page. This page shows everything about the count and is where all counting work happens.
Header
A collapsible card at the top of the page shows:
| Element | Description |
|---|---|
| Warehouse | Store icon with warehouse name and code |
| Assigned user | Person icon with the user name — shown when assigned |
| Created date | Calendar icon with creation timestamp (dd.MM.yyyy HH:mm) |
| Modified date | Edit icon with last-modified timestamp — shown only when different from created date |
| Status badge | In Progress (blue) or Completed (green) |
The header collapses when you scroll down and reappears when you scroll up.
Action buttons
Below the header, three action buttons are shown on active (non-completed) counts:
| Button | Colour | Action |
|---|---|---|
| Start Scan / Stop Scan | Blue / Red | Toggle RFID scanning — only shown when an RFID reader is connected |
| Add Products | Primary | Opens the Add Products page |
| Update Stock | Green | Submits counted quantities to the system |
On narrow screens the button labels shorten to Scan / Add / Update.
Item count toolbar
A toolbar row above the item list shows the total number of items and a Counted: N/M progress counter showing how many items have been counted so far.
Empty state
If no products have been added yet, the list shows No items in this count with an Add Products button in the centre of the screen.
Opening the Add Products page
- Open the count detail page.
- Tap Add Products in the action button row (or in the empty-state prompt).
- The Add Products page opens as a full-screen page.
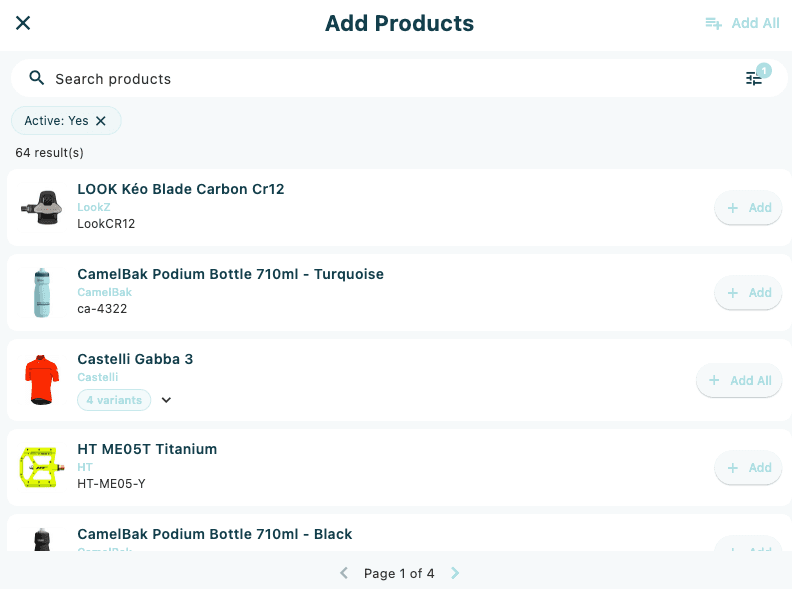
The page shows a search bar, optional filters, a result count, and a list of products.
Searching for products
Type in the search bar (placeholder: Search products) to filter by product name, SKU, or EAN. The results update automatically after a short pause.
Tap the filter icon (tune, right side of the search bar) to open the filters drawer. An accent-coloured badge on the filter icon shows the number of active filters when any are applied. Active filter chips are shown below the search bar.
The result count (N result(s)) is shown below the filter chips.
Adding a single-SKU product
- Locate the product in the list.
- Tap Add on the right side of the product card.
- The button changes to an Added outline button to confirm the product has been added.
Adding all variants of a product
Products with multiple variants show a variants badge (N variants) and an Add All button.
- Locate the parent product in the list.
- Tap Add All to add all variants to the count in one step.
- The button changes to Added once all variants are added.
To add only specific variants:
- Tap the product card (or the chevron icon) to expand the variants list.
- The Variants section opens below the product row, listing each variant with its SKU, name, and colour/size chips.
- Tap Add on the specific variant row you want to include.
Adding all search results at once
To add every product matching the current search and filters:
- Tap Add All (playlist-add icon, top-right of the page).
- A confirmation dialog appears: This will add N product(s) matching the current search and filters to the inventory count. Continue?
- Tap Add All to confirm, or Cancel to go back.
- On success, a Added N SKUs to count confirmation appears and the page closes automatically.
Adding all products applies the current search query and any active filters. Make sure your filters are set correctly before confirming, as this can add a large number of lines to the count.
Closing the Add Products page
Tap the X (close) button in the top-left corner to return to the count detail page. Any products already added in this session are saved immediately — there is no separate save step.
Adding a product by scanning a barcode
You can also add products directly from the count detail page by scanning a barcode, without going into the Add Products page.
Camera scanner (mobile only):
- Tap the overflow menu (⋮) in the top-right corner of the count detail page.
- Tap Scan.
- Point the camera at the product barcode.
Hardware scanner:
Scan the barcode directly with the hardware scanner while the count detail page is open.
Scan result — product already in count
If the scanned EAN or SKU matches a product already on the count, a dialog opens immediately to record the counted quantity. See Scanning Products for details on this flow.
Scan result — product not in count
If the scanned code does not match any product on the count, a dialog opens showing the product details (or Product not found if the code is unrecognised). Tap Add to Count to add the product and immediately record its quantity.
Reading the item list
Each product in the count appears as a card. Cards show four quantity columns:
| Column | Label | Description |
|---|---|---|
| NFC icon | Scanned | Quantity recorded by RFID scanning — blue background |
| Editable field | Counted | Quantity entered manually or via barcode scan — green border when counted |
| Read-only | System | Current system inventory quantity |
| Read-only | Diff | Difference between Counted and System quantities — green (positive), red (negative), grey (zero) |
A very subtle green background on the card indicates the item is counted and the difference is zero (system and counted match exactly).
Tap the SKU/EAN line on a card to navigate to the full product detail page.
The Scanned column shows quantities from RFID scanning. If a scanned quantity is pending (not yet merged into the Counted column), the column shows a blue border and the tooltip reads Scanned quantity (unsaved) — tap for details. Tap the column to see a breakdown of previously scanned, added this session, and total scanned quantities.
Removing a product from the count
Removing a product from a count deletes its counted quantity. This cannot be undone.
- Tap the delete icon (bin outline) on the right side of the item card.
- A confirmation dialog appears: Remove "[name]" from this count?
- Tap Remove (red) to confirm, or Cancel to go back.
Deleting the entire count
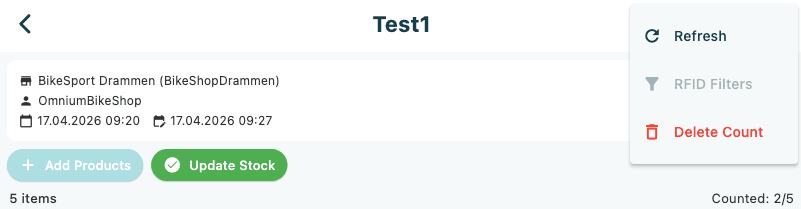
To delete the count and all its items from the count detail page:
- Tap the overflow menu (⋮) in the top-right corner.
- Tap Delete Count (shown in red).
- A confirmation dialog appears: Are you sure you want to delete "[name]"? This will also delete all items.
- Tap Delete (red) to confirm, or Cancel to go back.