
Purchase Order Detail
View, edit, and manage the contents, status, supplier, notes, and deliveries of an individual purchase order.
The purchase order detail page is the central workspace for a single order. It shows the order's status, all line items, associated deliveries, supplier information, and internal or public notes. From this page you can advance the order through its workflow, add or remove products, create deliveries, and record notes.
The page title shows the PO number in the format PO #[number].
Page layout
The layout adapts to screen size:
- On tablet (wide screen): a two-column layout. The left column shows the status progress bar and the Order Lines / Deliveries tabs. The right column shows the status card, details panel, supplier panel, and notes.
- On mobile (narrow screen): a single scrollable column with the same sections stacked in order: progress bar → status card → details → tabs → supplier → notes.
Status progress bar
At the top of the page a horizontal progress bar visualises where the order sits in its workflow. Each stage is shown as a labelled step; the current status is highlighted.
Updating the order status
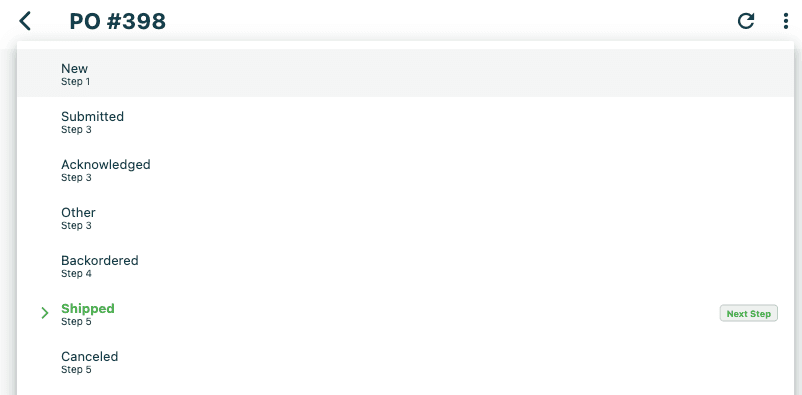
The Update Status card shows the current status as a colour-coded badge and lets you move the order to the next stage.
Reading the card
| Element | Description |
|---|---|
| Current status badge | Colour-coded pill in the card header showing the current status |
| Next Step dropdown | Lists all valid statuses the order can move to. The recommended next step is pre-selected and marked with a green arrow icon and a Next Step badge. |
| Current status label | Shown in small text below the dropdown |
| Action button | Full-width button labelled with the selected status name. Green when the recommended next step is selected; accent colour for other options. |
Advancing the status
- In the Update Status card, confirm the status shown in the Next Step dropdown is correct — or tap the dropdown to choose a different valid status.
- Tap the action button (labelled with the target status name).
- The page reloads and the status badge and progress bar update.
When the order is in a read-only status (such as Completed or Cancelled), the dropdown and button are hidden and a lock icon is shown next to the current status. No further status changes can be made from within the app.
Details panel
The Details panel shows the order's metadata fields:
| Field | Description |
|---|---|
| Name | Optional descriptive name for the order |
| Reference Number | The supplier's reference for this order |
| PO Number | The internal purchase order number |
| Created | Date the order was created |
| Requested Delivery Date | Expected delivery date — shown as Not set if none was entered |
| Tags | Labels applied to the order, shown as chips |
| Origin | Source system or integration that created the order, if applicable |
Editing order details
Tap the edit (pencil) icon in the top-right corner of the Details panel to open the edit dialog. The following fields can be changed:
- Name
- Reference Number
- Requested Delivery Date — tap the field to open a date picker
- Tags — tap Add to enter a new tag; tap the × on an existing tag chip to remove it
Tap Save to apply changes or Cancel to discard them. A Details saved confirmation appears on success.
The edit icon is hidden when the order is in a read-only status.
Order Lines tab
Tap Order Lines (N) to view the tab showing all line items in the order. The number in brackets shows the total line count.
Line item cards
Each line appears as a row with:
| Element | Description |
|---|---|
| Checkbox | Tap to select the line for bulk actions (hidden on read-only orders) |
| Product image | Small thumbnail |
| SKU / Brand | Shown in small text above the product name |
| Product name | Bold; tap to open the product detail page |
| Error / Warning icons | Red error icon or orange warning icon — tap to see the message |
| Size / Colour chips | Shown when variant attributes are present |
| Warehouse badge | Shows the warehouse associated with this line |
| Delivery link | Shown when the line has been added to a delivery — tap to open the delivery |
| Reservation badge | Shows the number of open order reservations for this SKU |
| Cancelled badge | Shows the cancelled quantity in red if units have been cancelled |
| Inventory badge | Current stock level for this SKU at the order's warehouse |
| Total | Line total (quantity × unit cost price), shown in bold on the right |
| Unit price | Cost price per unit, shown below the total |
| Quantity badge | Ordered quantity |
Line item context menu
Tap a line item (when not in selection mode) to open a context menu with:
| Option | Action |
|---|---|
| Edit Line | Opens a dialog to change the Qty and Cost Price for this line |
| Go to Delivery | Opens the linked delivery (shown only when the line has a delivery) |
| Go to Product | Opens the product detail page for this SKU |
Editing a line
- Tap the line item and select Edit Line from the context menu.
- In the dialog, update the Qty and/or Cost Price fields.
- Tap Save. A Item updated confirmation appears.
Adding a product
Tap Add Product (top-right of the Order Lines header) to open the product picker and add a new line to the order. Enter the quantity and optional cost price, then confirm.
Error and warning filters
If any lines have processing errors or warnings, red and orange filter badges appear next to the Order Lines heading. Tap a badge to show only lines with that issue type; tap again to clear the filter.
Order total
Below the line list, a totals row shows the sum of all line costs grouped by currency.
Deliveries tab
Tap Deliveries (N) to switch to the deliveries view. Each delivery appears as a card showing:
| Element | Description |
|---|---|
| Delivery ID | For example Delivery #42 |
| Status badge | Current delivery status |
| Warehouse route | Source → destination warehouse |
| ETA | Estimated arrival date, if set |
| Tracking number | Carrier tracking reference, if set |
| Created date | Date the delivery was created |
Tap a delivery card to open the Delivery Detail page.
When no deliveries exist, a No deliveries placeholder is shown.
Selecting lines and bulk actions
Tap the checkbox on a line item to select it. Once one or more lines are selected, a floating action bar appears at the bottom of the screen showing the number of selected items and three actions:
| Action | What it does |
|---|---|
| Create Delivery | Opens the Create Delivery dialog for the selected lines |
| Delete (red) | Deletes the selected lines after confirmation |
| Clear | Deselects all lines and dismisses the action bar |
To select all lines at once, tap the select all checkbox in the Order Lines header.
Lines that are already assigned to a delivery cannot be selected for bulk actions.
Creating a delivery
- Select one or more lines using their checkboxes.
- Tap Create Delivery in the action bar.
- In the Create Delivery dialog, set the estimated time of arrival and choose whether to create a new delivery or add the lines to an existing one.
- Confirm to create the delivery.
Supplier panel
The supplier panel shows the source of the order:
For supplier orders:
- Supplier name, ID, email, and phone number
For internal transfers:
- From Warehouse — the source warehouse code
- To Warehouse — the destination store or warehouse
Notes
The notes panel has two sections: Internal Notes (visible only within the system) and Public Notes (can be sent to the supplier by email or SMS).
Adding a note
- Tap Add Note in either the Internal Notes or Public Notes section.
- Enter the note text.
- Optionally enter an email recipient, phone number, email subject, and toggle whether to send a notification.
- Tap Save. A Note added confirmation appears.
Deleting a note
Tap the delete icon on a note to remove it. A Note deleted confirmation appears.
Deleting a purchase order
Deleting a purchase order is permanent. This action cannot be undone.
- Tap the overflow menu (⋮) in the top-right corner of the AppBar.
- Tap Delete (shown in red).
- A confirmation dialog appears: Are you sure you want to delete this purchase order?
- Tap Delete (red) to confirm, or Cancel to go back.
On success, a Purchase order deleted message appears and the app returns to the purchase orders list.
The overflow menu is hidden when the order is in a read-only status.