
Goods Reception
Receive incoming goods against a delivery and update stock.
Goods reception is the process of confirming what has physically arrived at the store against what was expected on a delivery. For each line you enter the quantity actually received, review any discrepancies, and then confirm — after which stock levels are updated automatically.
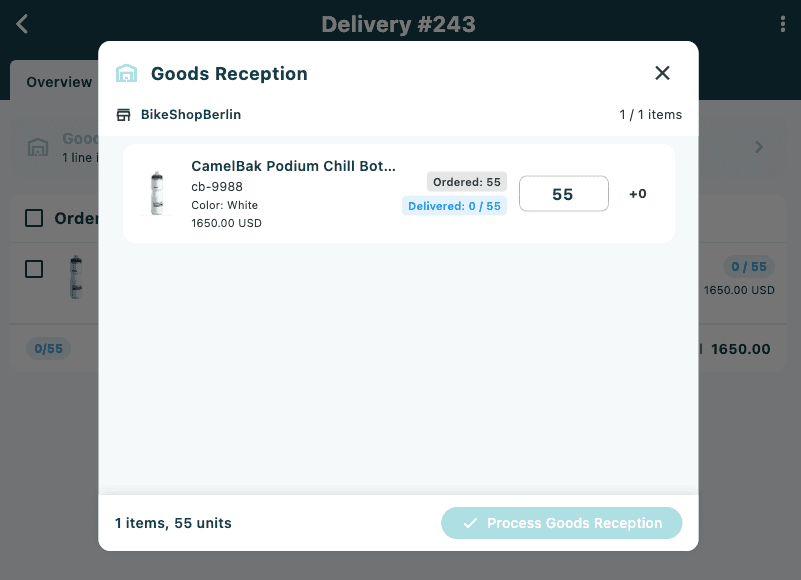
The Goods Reception dialog opens from the Goods Reception banner on the Delivery Detail view. It can only be dismissed by completing or cancelling — it cannot be closed by tapping outside it.
Opening goods reception
- Open a purchase order and go to the Deliveries tab.
- Tap the delivery you want to receive.
- On the Delivery Detail screen, tap the Goods Reception banner.
To receive only specific lines rather than the full delivery, select the lines first (tap their checkboxes in the Order Lines card) and then tap the banner. The dialog will contain only the selected lines.
The Goods Reception dialog
The dialog is laid out in four sections:
Header
The title bar shows Goods Reception with two controls:
- NFC icon — toggles RFID scanning mode. Only shown when an RFID scanner is paired with the device.
- × (close) — cancels the process and closes the dialog without saving.
Summary bar
Directly below the title, a summary bar shows:
- The destination warehouse code (store icon on the left)
- X / Y items — how many lines currently have a quantity greater than zero, out of the total
Line cards
Each product line in the delivery appears as a card. Every card shows:
| Element | Description |
|---|---|
| Product image | Thumbnail, or a placeholder icon if no image is available |
| Product name | Display name of the variant |
| SKU / Supplier SKU | Internal code and supplier reference, separated by / |
| Size / Colour | Shown when values are present |
| Line cost | Extended price excluding tax |
| Ordered chip | Total quantity originally ordered |
| Delivered chip | Units already received on previous receptions versus the expected total (green when complete, blue when partial) |
| Cancelled chip | Cancelled quantity, shown in orange — only visible when greater than zero |
| Receive Qty field | Editable quantity field for this reception. Pre-filled with the remaining quantity (ordered minus already delivered minus cancelled). |
| Deviation | Shown to the right of the quantity field. Green +N if receiving more than expected, red −N if receiving fewer, grey 0 if exact. |
Bottom bar
The bottom bar shows a running summary and the action button:
- X items, Y units — the count of lines with a quantity entered, and the total number of units across all those lines.
- Process Goods Reception — confirms and submits the reception. Disabled when no lines have a quantity greater than zero, and while processing is in progress.
Adjusting quantities
Each line is pre-filled with the remaining undelivered quantity. Adjust the value if the actual delivery differs:
- Tap the Receive Qty field for a line and type the actual quantity received. The keyboard is set to numeric input.
- Reducing the quantity below the expected amount shows a red negative deviation.
- Entering more than the expected amount shows a green positive deviation.
- Setting a line's quantity to 0 excludes it from the reception — that line will not be updated.
Lines with a quantity of 0 are not submitted. Use this to skip lines that have not arrived yet without cancelling the entire reception.
Confirming the reception
- Review all quantities and deviations.
- Tap Process Goods Reception.
- A confirmation dialog appears:
- Title: Process Goods Reception
- Message: "Are you sure you want to process goods reception? This action cannot be undone."
- Tap Process Goods Reception again to confirm, or Cancel to go back and adjust.
On success, a green confirmation banner appears briefly and the dialog closes. The Delivery Detail view reloads to show the updated delivered quantities.
Goods reception cannot be undone once confirmed. Double-check quantities and deviations before tapping Process Goods Reception in the confirmation dialog.
Using RFID scanning
If an RFID scanner is paired with the device, an NFC icon appears in the top-right corner of the Goods Reception header.
RFID scanning is only available when a compatible RFID scanner is paired. If you do not see the NFC icon, proceed with manual quantity entry.
Switching to RFID mode
- Tap the NFC icon in the header to enter RFID mode.
- All Receive Qty fields reset to 0 — quantities will be filled automatically by the scanner.
- An RFID scanning bar appears below the summary bar, showing the number of tags detected and two controls:
- Scan / Stop — starts or stops the scanner.
- Clear — removes all scanned tags and resets quantities to 0. Only visible when at least one tag has been scanned.
Scanning items
- Tap Scan in the RFID bar.
- Hold the scanner over the goods. The status text updates in real time: "Scanning... N tags".
- As tags are detected, the corresponding Receive Qty fields update automatically. Each tag is matched to a line by its EAN or GTIN; tags that do not match any line are ignored.
- Tap Stop when all items have been scanned.
- Review the filled quantities. The Receive Qty fields are read-only in RFID mode — to correct a line, use Clear to start over, or switch back to manual mode by tapping the NFC icon again.
Returning to manual mode
Tap the NFC icon again to leave RFID mode. Quantities already filled by the scanner are retained and the fields become editable again.