
Processing a Pick List
Start, pick, and complete a pick list.
A pick list groups items from one or more orders that need to be physically located and prepared for shipment. Processing a pick list moves it through three stages: starting it (Set In Progress), recording the items you have collected (using the Picked quantity fields or a scanner), and finalising it (Update & Complete) to update the linked orders.
Opening a pick list
Navigate to the Pick Lists tab under Fulfilment → Pick Lists, then tap a list to open its detail page.
The page title shows the list name and ID in the format [Name] #[ID].
Reading the pick list header
At the top of the page a collapsible header summarises the list. On scroll it collapses to save screen space; tap it to expand again.
| Element | Description |
|---|---|
| Warehouse name and code | The warehouse the list is associated with |
| Assigned user | The staff member the list is assigned to |
| Created date | When the pick list was created |
| Status badge | Colour-coded current status |
Below the header, a row of stat chips shows totals at a glance:
| Chip | What it counts |
|---|---|
| Orders | Number of linked orders |
| Shipments | Number of linked shipments |
| Products | Total number of distinct product lines |
| Volume | Total volume across all lines |
Starting a pick list
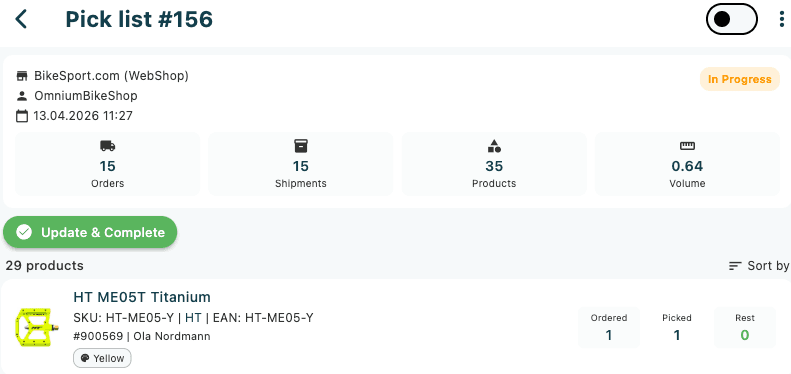
A newly created pick list has the status New. Before you can update quantities, set it in progress.
- Open the pick list.
- In the action row at the bottom of the screen, tap Set In Progress.
- The status badge changes to orange In Progress and the Set In Progress button is replaced by Update & Complete.
Set In Progress is only shown when the pick list has the status New. If the list is already In Progress, only Update & Complete is shown.
Enabling picking
Tap the Enable Picking switch in the top-right corner of the AppBar to activate the editable quantity fields on each item card.
When Enable Picking is on:
- The Picked quantity column becomes an editable number field with a highlighted border.
- A Quick Pick button (circle outline icon) appears on the right side of each item row.
- The Enable Picking switch is hidden when the pick list is completed.
Reading item cards
Each product line appears as a card. The card background colour indicates picking progress:
| Background | Meaning |
|---|---|
| Green tint | All units have been picked |
| Red tint | Zero units delivered (item flagged as not in stock) |
| Orange tint | Partially picked — some units remain |
| No tint | Not yet counted |
Card content
| Element | Location |
|---|---|
| Product image | Left side (small thumbnail) |
| Product name | Top-left, bold |
| SKU / Brand / EAN | Second line below name |
| Location code | Below SKU, prefixed with a pin icon |
| Order link | Order number (tappable) and customer name |
| Ordered (qty) | Right-side quantity box, grey background |
| Picked (qty) | Right-side quantity box, editable when picking is on; green border when counted |
| Rest (qty) | Right-side quantity box; red tint if units remain, green if zero, orange if negative |
Picking items manually
- Locate the item on the shelf.
- Tap the Picked quantity field on the item card.
- Enter the number of units collected.
- Tap another field or confirm on the keyboard to save the value.
Quick Pick
Tap the circle icon (Quick Pick) to the right of the quantity boxes to set the Picked quantity to the full Ordered amount in one tap. The icon turns solid green and the card background turns green when all units are counted.
Tap the icon again to unset the picked quantity.
Scanning items
On mobile devices, use the built-in camera or a paired hardware barcode scanner to record picks without typing quantities.
Camera scanner
- Tap the overflow menu (⋮) in the top-right corner.
- Tap Scan.
- The camera scanner opens. Point it at the item barcode.
- The scan dialog appears automatically when a barcode is recognised.
Hardware scanner
Scan the barcode directly using the hardware scanner. The scan dialog opens immediately when a match is found.
Scan dialog
The scan dialog appears when a scanned EAN or SKU matches one or more items on the pick list.
| Element | Description |
|---|---|
| Product image | 48 × 48 thumbnail |
| Product name | Shown in bold |
| SKU and EAN | Shown below the name |
| Location | Shown with a pin icon |
| Notice banner | Blue banner showing the number of matching lines when more than one line matches the scanned code |
For each matching line, the dialog shows:
- Order context row — order number (tappable), customer name, and shipment label
- Quantity boxes — Ordered, Picked (editable), Rest
- Picked toggle — circle icon that turns green when the item is marked as picked
Keyboard shortcuts
- Press Enter on a single-item dialog: saves and closes immediately.
- Press Enter on a multi-item dialog: moves focus to the next quantity field.
Tap Cancel to close without saving. Tap Save to apply the entered quantities.
Viewing by shipment or product
By default the list is grouped by shipment. To switch to a flat product view, tap the overflow menu (⋮) and choose Products. Tap Shipments to return to the shipment-grouped view.
Sorting the item list
Tap the sort icon in the toolbar to open the sort menu. Available options:
| Option | Description |
|---|---|
| Location A–Z | Sort by shelf location code, ascending |
| Location Z–A | Sort by shelf location code, descending |
| Products A–Z | Sort alphabetically by product name |
| Products Z–A | Reverse alphabetical order by product name |
| SKU A–Z | Sort alphabetically by SKU |
| Orders A–Z | Sort by order number |
| Customer A–Z | Sort alphabetically by customer name |
| Quantity (high to low) | Sort by ordered quantity, descending |
Completing a pick list
When all items have been picked, finalise the list to update the linked orders.
- Tap Update & Complete in the action row at the bottom of the page.
- A confirmation dialog appears: Complete this pick list and update all orders?
- Tap Update & Complete (green) to confirm, or Cancel to go back.
- On success, the pick list status changes to Completed and the action row and Enable Picking switch are hidden.
Completing a pick list updates the status of all linked orders. This action cannot be undone from within the app.
Overflow menu actions
Tap the overflow menu (⋮) to access additional actions:
| Action | Description |
|---|---|
| Scan | Opens the camera scanner (mobile only) |
| Shipments / Products | Toggles the grouping view between shipment and product |
| Print Thermal | Sends the pick list to a paired receipt printer |
| Print PDF | Generates a printable PDF of the pick list |
| Reset to Ordered | Resets all Picked quantities back to the full Ordered amount |
| Reset to Zero | Sets all Picked quantities to zero |
| Set All Counted | Marks all lines as counted without changing quantities |
| Set All Not Counted | Removes the counted flag from all lines |
| Refresh Pick List | Reloads pick list data from the server |
| Reload | Reloads the full page |
| Delete Pick List | Permanently deletes the pick list (shown in red) |
Print Thermal requires a receipt printer to be configured in Hardware Settings. If no printer is set up, a warning is shown and the option is unavailable.
Printing a pick list
- Tap the overflow menu (⋮).
- Tap Print Thermal (for a receipt printer) or Print PDF (for a PDF document).
- For thermal printing, the job is sent immediately to the configured printer. For PDF, the document is generated and the system share sheet opens.
Resetting quantities
| Action | When to use |
|---|---|
| Reset to Ordered | You have entered incorrect quantities and want to start over with full amounts |
| Reset to Zero | You want to start picking from scratch with all quantities at zero |
Deleting a pick list
Deleting a pick list is permanent and cannot be undone. Linked orders are not automatically updated.
- Tap the overflow menu (⋮).
- Tap Delete Pick List (shown in red).
- A confirmation dialog appears: Are you sure you want to delete this pick list?
- Tap Delete to confirm, or Cancel to go back.
RFID locate
If a device with an RFID reader is connected, a locate icon (track changes circle) appears on each item card. Use it to physically locate the item by RFID proximity.
- Tap the RFID locate icon on the item card.
- A bottom sheet opens showing the product name, EAN, and a list of matching RFID tags.
- Tap Locate next to a tag.
- The bottom sheet switches to the proximity view, which shows a bar that fills from red (far) to green (close) as you move towards the item.
- Tap Stop Locating (red) to end the session and return to the tag list.