
Access Rights and Roles
Restrict which navigation areas, sale and order actions, and settings each employee can use by assigning them roles.
Access rights let you control what each employee can see and do in the app. Instead of every signed-in employee having the full set of features, you assign each one a role, and each role is granted access to specific navigation areas, actions, and settings. A cashier might be limited to taking sales and viewing products, while a store manager keeps full access including returns, price edits, and the Settings menu.
Access rights build on multi-user mode: they only take effect when several employees share a device and each signs in with their own identity. This page explains how roles map to access, how to assign roles to employees, and exactly what gets restricted.
What each role can access is configured in the Omnium back office, under Configuration → POS → Access Rights. The In-Store App reads that configuration and applies it to whichever roles an employee is assigned. See Configuring access in the back office below.
Prerequisites
- Multi-user mode must be enabled for the tenant. Without it, the device runs as a single shared account and no access rights are applied — every feature is available. See Multi-User Mode.
- At least one role must be defined and configured in the Omnium back office.
- Only administrator employees can assign roles to other employees in the app.
How access rights work
When an employee signs in on the lock screen, the app works out their effective access rights — the combined set of everything the roles assigned to them are allowed to use. The app then shows only those areas, actions, and settings.
A few rules govern who sees what:
| Situation | Result |
|---|---|
| Single-user mode (multi-user off) | No restrictions — every feature is available. |
| Employee is an administrator | Full access. Admins bypass all role checks. |
| Employee has one or more roles | Access is the union of every right granted by their roles. |
| Employee has no role assigned | They see only areas that are marked available for all. |
| No roles configured for the tenant yet | No restrictions — the app behaves as before roles existed. |
Access rights hide features rather than disabling them. An employee without the right simply does not see the navigation tab, button, or settings tile — there is no greyed-out control or "permission denied" message.
An access area can be marked available for all in the back office. Anything marked this way is shown to every employee regardless of their role — even employees with no role assigned. Use it for areas everyone needs, such as taking a sale or looking up a product. See Configuring access in the back office.
What access rights control
Access rights apply at three levels: whole navigation areas, individual actions within a page, and individual settings.
Navigation areas
Each of these is a tab or section in the sidebar (or bottom navigation on phones). If an employee's roles do not grant the area, the tab does not appear and the page cannot be opened.
| Area | Controls |
|---|---|
| Sales / Home | The home dashboard and the point-of-sale sale screen |
| Orders | The order list and order detail pages |
| Carts | Saved and parked carts |
| Products | Product search and product detail |
| Customers | Customer search and customer detail |
| Promotions | Promotions and campaigns |
| Inventory Count | Stock counts |
| Pick List | Orders to pick and shipments |
| Purchase Orders | Purchase order list and detail |
| Deliveries | Goods reception / deliveries |
| Reports | Reporting |
| Transaction Log | The POS transaction log |
| Settings | The Settings menu (individual tiles can be restricted further — see below) |
Actions within a page
These are fine-grained capabilities that sit inside a page an employee can otherwise open. When the right is not granted, the corresponding button or control is hidden.
| Action | Where it appears | Effect when not granted |
|---|---|---|
| Apply Discounts | Cart line and cart totals | The discount control is hidden; the employee cannot add a discount to a line. |
| Edit Price | Cart line editor | The price field is read-only — the employee cannot override a line price. |
| Edit Tax | Cart line editor | The tax field is read-only — the employee cannot change a line's tax. |
| Process Returns | Home return tile, order detail | The Return tile on Home and the return actions on an order are hidden. |
| Cancel order line | Order detail | The Cancel order lines button is hidden. |
| View Cost Price | Product detail | Cost price figures are hidden from the product view. |
Settings
When an employee can open Settings, each tile is gated individually. Only the tiles their roles allow are shown.
| Setting | Tile |
|---|---|
| Manage Employees | Add, edit, and remove employees |
| Default Market | The device's default market |
| Default Store | The device's default store |
| Default Order Type | The default order type for new sales |
| Register | Register selection |
| Cash Drawer | Cash drawer configuration |
| Opening Float | Opening float / cash count |
| Receipt Templates | Receipt template selection |
| Receipt Printer | Receipt printer setup |
| Payment Terminal | Payment terminal setup |
| Customer Display | Customer display setup (Windows only) |
Configuring access in the back office
What each role can access is set up in the Omnium back office, not in the app. Open Configuration in the left sidebar, then the POS tab, then the Access Rights sub-tab.
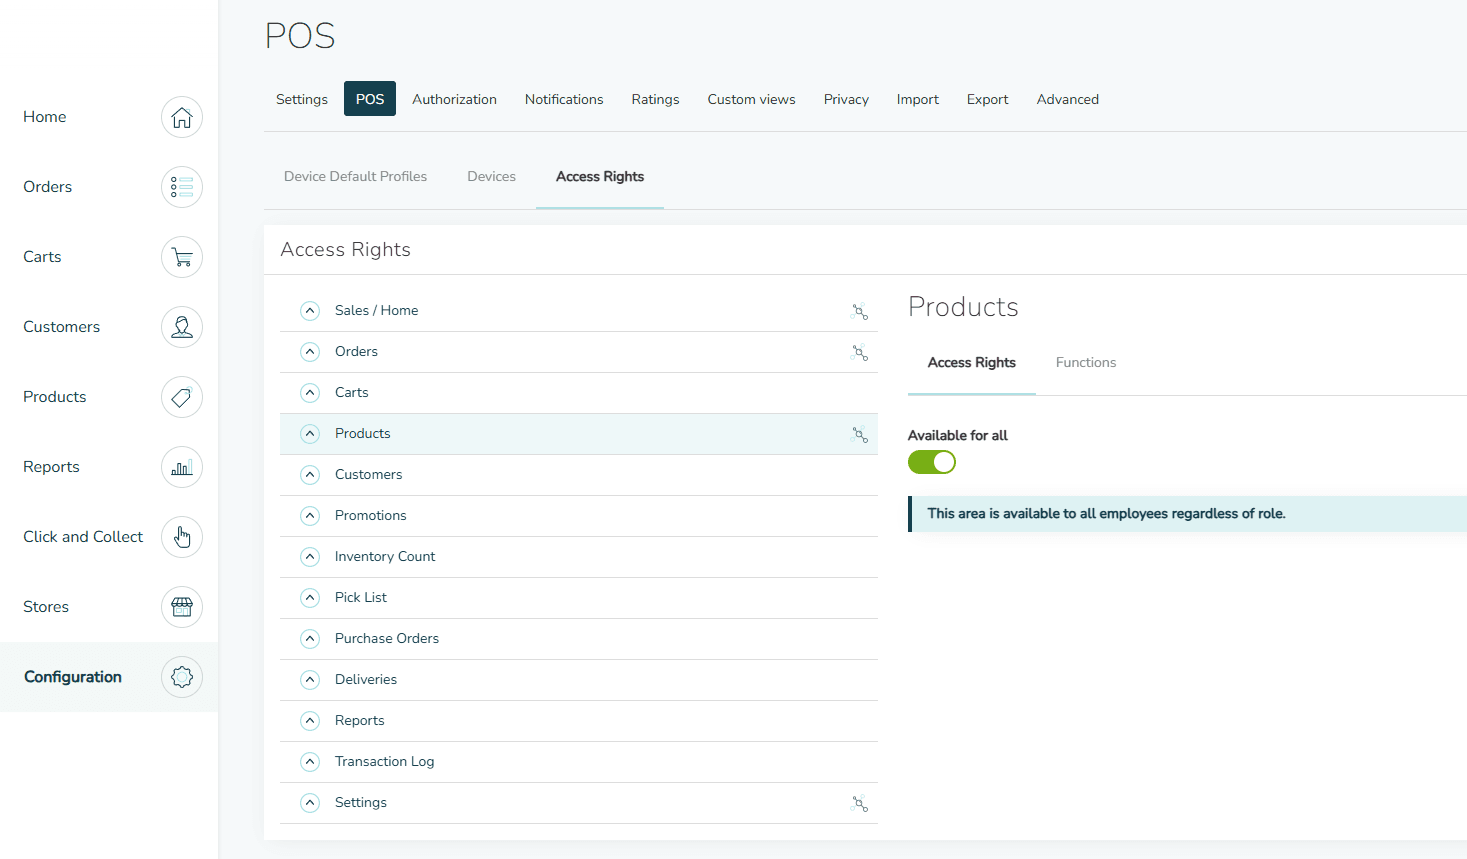
The left side is a tree of every access area — the same navigation areas listed above (Sales / Home, Orders, Carts, and so on). Select an area to configure it on the right. A small link icon next to an area means it has configurable functions (see below).
Available for all
Each area has an Available for all toggle on its Access Rights tab. When it is on (the default), the area is available to every employee regardless of role, and a note confirms This area is available to all employees regardless of role. Leave it on for areas everyone needs, such as taking a sale or looking up a product.
Restricting an area to specific roles
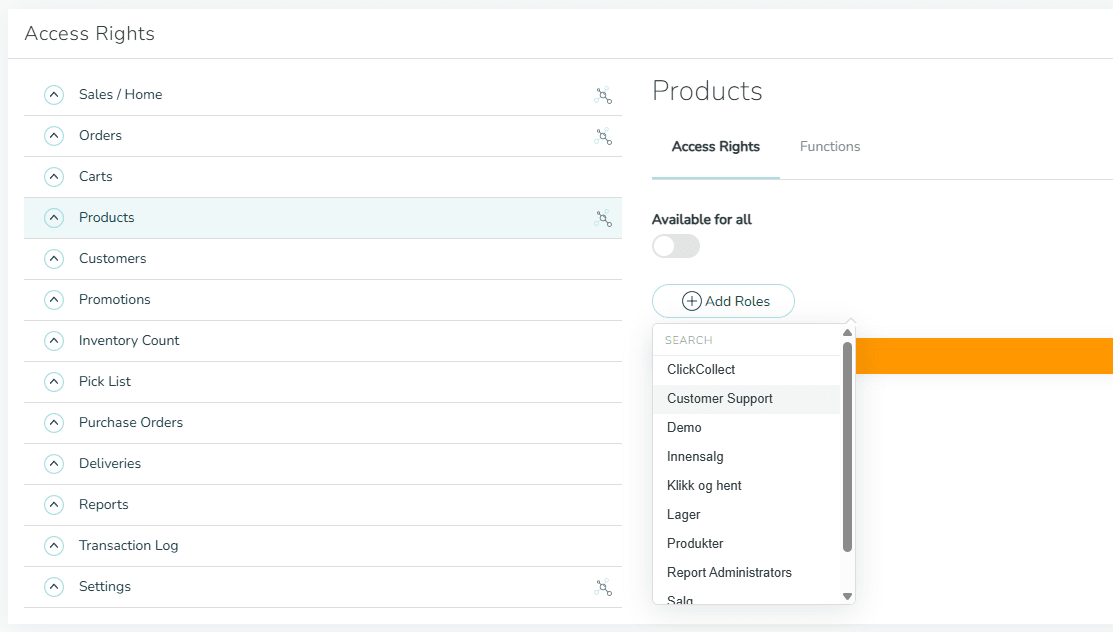
Switch Available for all off to limit the area to chosen roles. Tap Add Roles and pick one or more roles from the searchable list. Only employees holding one of those roles will see the area; everyone else has it hidden. While no roles are added, a warning reminds you that No roles have access.
Functions
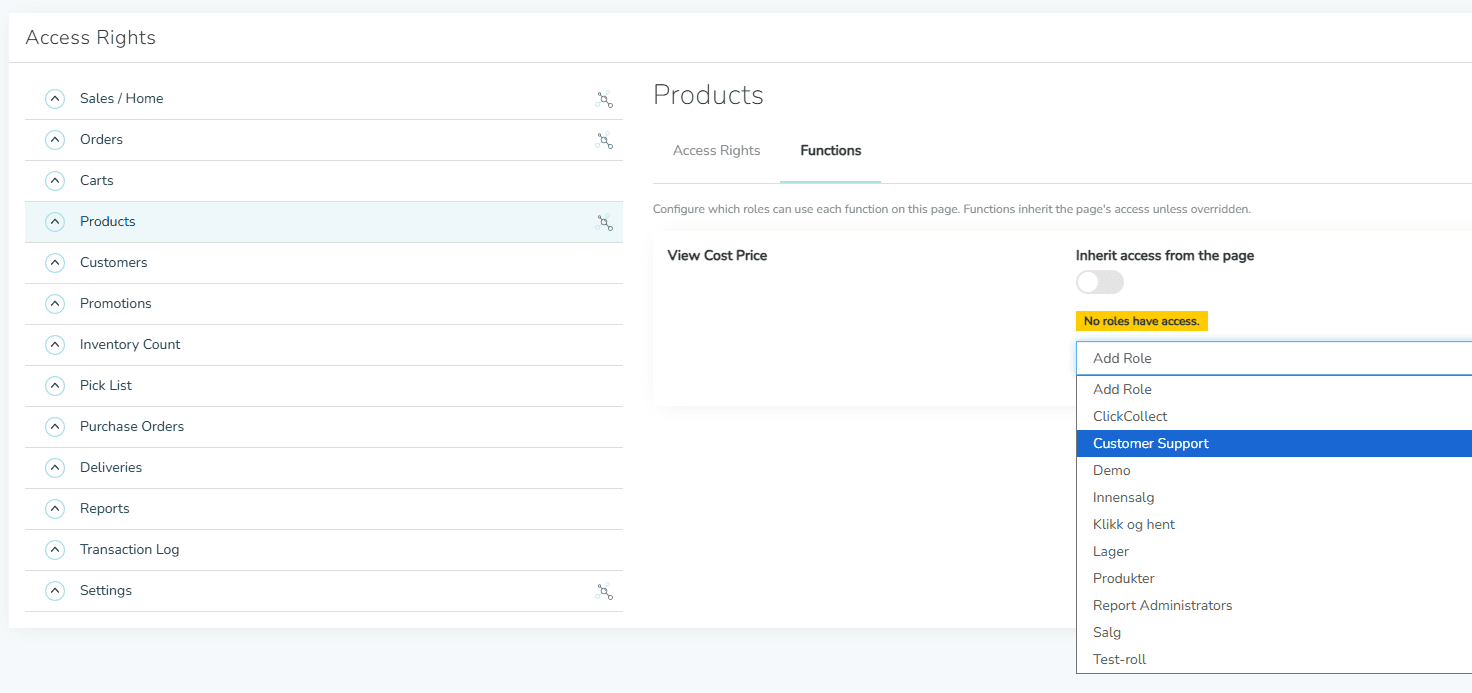
Some areas own finer-grained functions — the actions listed under Actions within a page, such as View Cost Price on the Products area. Open the Functions tab to configure them.
By default each function has Inherit access from the page switched on, so it follows whatever the page resolves to. Switch it off to give the function its own role list — for example, to let everyone browse Products but allow only managers to View Cost Price, leave the Products page available for all but override View Cost Price with just the manager role.
Saving
Changes are staged as you edit. When there are unsaved changes the editor shows an Unsaved changes indicator with a Save button — tap Save to apply them. In-store devices pick up the new configuration on their next sync with the server.
Assigning a role to an employee
Roles are assigned to employees on the Manage Employees page. Only administrators can do this.
- Open Settings → Multi-User → Manage Employees.
- Tap an employee row (or ⋮ → Edit) to open the Edit Employee dialog — or tap + to add a new one.
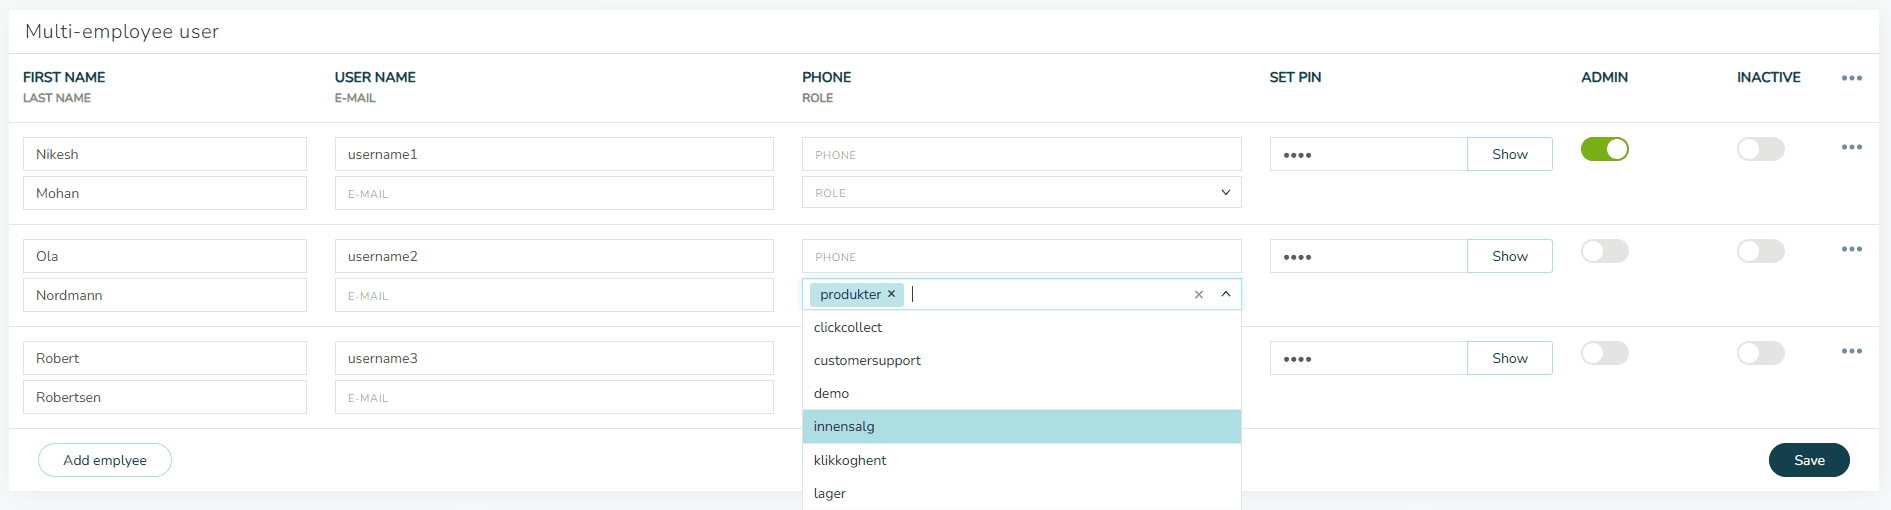
- In the Role field, tap to open the role list and select one or more roles. The field supports multiple selections; the employee's access is the union of all roles chosen.
- Tap Save in the dialog to stage the change.
- Tap Save in the AppBar to send the change to the server.
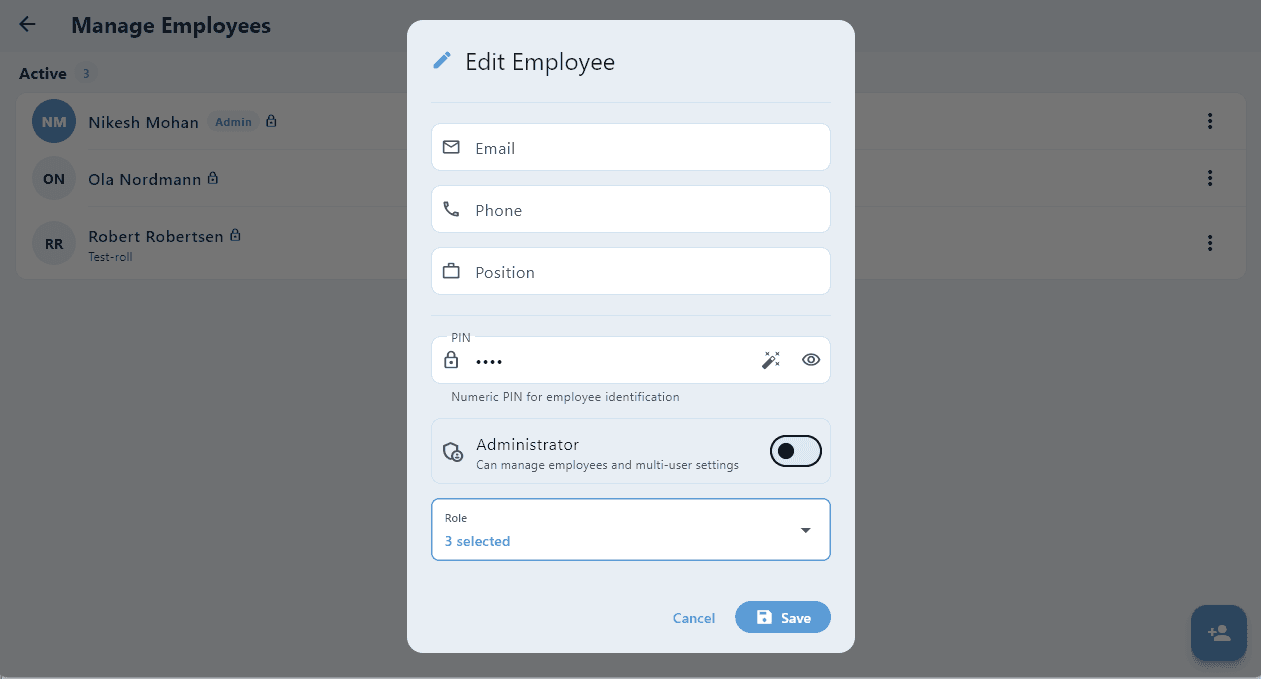
The Role field is hidden when the Administrator toggle is on. Administrators always have full access, so a role would have no effect — turning on Administrator clears any roles already assigned.
The roles assigned to an employee are also shown beneath their name on the employee list, alongside their position and email.
Roles can also be assigned in the Omnium back office on the Edit User page, where each employee row has a Role selector. Changes made there and in the app are kept in sync.
Variations
An employee sees fewer tabs than a colleague
This is expected when the two employees have different roles. The app shows only the navigation areas, actions, and settings their roles grant. Check the roles assigned on Manage Employees, or ask your administrator what each role is allowed to access.
A button or tab disappeared after signing in
Access rights are evaluated per employee at sign-in. If a feature was visible under one employee and not another, the second employee's roles do not include that right. Lock the screen and sign in as an administrator (or an employee with the right) to use the feature.
Changes to a role are not reflected yet
Role configuration changes made in the back office reach the device on its next sync with the server. If a change is not visible, lock and unlock the device, or sign out and back in, to pick up the latest configuration.